Plan A
Posted: April 20, 2015 Filed under: Documentation, Subject, Third Year | Tags: body, casting, documentation, female body, female figure Leave a commentMy plan A was a solid sculpture of my torso and back. I mentioned in an earlier post that my original idea wasn’t sturdy enough and the mould fell apart when it was taken off my body. As this was constructed in two pieces, joining them up to match perfectly is quite difficult so when I was layering mod rock, there were some areas of the mould that weren’t accurate to my body.


I managed to find a half decent place where my mould could be stable – a box, trapped between two tables. When pouring in the plaster, I had to do it in layers. This worried me a bit as I didn’t want one layer to dry up before I did another layer. With the pole, I stuck it in when I was about half way through the mould. Unfortunately, as I was doing more layers, the pole became slanted, even worse, I couldn’t get the pole out of the sculpture which meant I would have to rework the plinth.
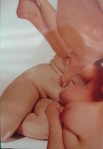
I enjoyed taking the mould off, as it was if I was stripping off the negative thoughts of my body.When all the mould came off though, I found it very weird to see my shape. Although, you see your body everyday, it’s not the same as when it is 3-dimensional in front of you.


Some of it came our really well, particularly my back and stomach. The plaster didn’t reach the end of my breasts in my mould so they didn’t come out too well either. Even after sanding and trying to rework by shaping it, I don’t feel it will be ready for the degree show so I decided (with help and advice from my peers) to make plan B. Even if plan B doesn’t work, I will be gaining more skills as I will be using a new material for the mould.
Life Drawing
Posted: March 17, 2015 Filed under: Documentation, Subject | Tags: body, documentation, drawing, female figure, subject Leave a comment


Prints and Photo Collages
Posted: February 26, 2015 Filed under: Documentation, Subject, Third Year | Tags: art, body, books, collage, contemporary, documentation, drawing, experimentation, female, female figure, prints Leave a commentI feel that I have done so much experimentation and yet need to do more. Everyone keeps suggesting to do bigger photos but I don’t think I am ready for that, plus photography isn’t a strong medium for me.


These were all done with black ink, through an etching onto a photograph. Some of the prints came out more clearer than others which I expected. I do really like the photograph after it has been used, I would prefer it to be a little more cleaned and then maybe made into books or safely displayed.


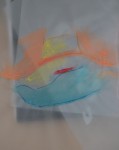
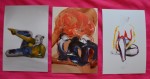
The coloured ones are with reference to the areas of my body I like and dislike. The top image came out really well whereas the second one was more of an accidental splodge (moved it while it was on the paper.) Although it doesn’t show the body shape, I like how the colours have merged together. I would like to try to create an image where the colour merges together, like this one, but where the body is recognisable.


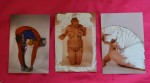
Some of these photo collages I really liked as they were and others I am thinking of stitching onto them. Figure 4 is probably one of my favourites, as my arms are extended in the same place in each image even though they are different poses. As I have previously written, I intended to create little books for my photos to go into. So far, I have made two for just photo collages, 2 for drawings (with pockets so the drawing can be taken out and rearranged with other pieces – they are the drawings that are based on the creases of my skin) and 2 that are made from drawings from tracing paper.


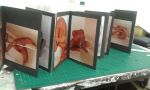


I am planning to make more so that all my photos and drawings can be displayed nicely. I don’t know whether I will display them within my final exhibition as it depends on what I produce as my final piece (still don’t have an idea yet) but I hope that they can be used in some way.
Experimentation with Colour and Stitch
Posted: February 20, 2015 Filed under: Documentation, Subject, Third Year | Tags: art, body, documentation, experimentation, female figure, photography, stitch, subject, watercolour Leave a commentIn an earlier post I mentioned how I don’t use colour and that if I did use colour it would be to represent areas of my body that I like and dislike. For example, red is a warm colour so I would use red in the areas of my body that I like. Colours inbetween the primary colours, like purple and green are difficult. I have been using greens as positive colours and purples as negatives. Through experimentation, I noticed that the reds and blues stayed in the same places whereas greens and purples have been changing. I don’t know whether this is due to me beginning to love areas of my body or that I got bored of painting the same areas the same colour. I think it may be the latter however, I began to realise that it may have been to how I was feeling that day. This is very personal and exactly why I use colour to represent my feelings towards myself.
I thought using ink would be a good idea to start as it would create soft works as the ink dispersed into the wetted paper. Using the representations of colour, I found these were abstract although some were still direct to the body. I particularly like the few that are not obvious images of the body.


I began with watercolours on tracing paper. I wanted to show the curves and folds of my body but as I mixed the powder myself, I got too excited with throwing it around my studio and got distracted with what I was supposed to be doing.
Using machine stitch on tracing paper is difficult, as the paper is so thin. I ripped a lot of the drawings with my machine so I tried hand stitching – also didn’t go too well. I know that it would have been difficult and needs patience – something I didn’t have after sewing on many photographs earlier that day.


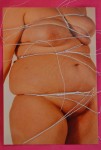
Using the machine on photographs were much easier as the paper is thicker and doesn’t rip as easily, or at all. These are the photographs that were taken in the AV studio. I have selected about 20 that I feel are the best to be framed. They are all black and white which I think makes them softer and more professional.
I chose some that would only have paint on them, others just stitch and others both paint and stitch. Some that I initially wanted stitch and paint on them, I found that I preferred with just paint and left them as they were. I have loads of originals left which I plan to collage. These photographs will be displayed in homemade sketchbooks. I don’t know what sketchbooks they will be yet, whether it’s constantines or books with pockets etc. I still need to experiment with these on a larger scale.


Preparation
Posted: December 10, 2014 Filed under: Contextualisation, Documentation, Subject, Third Year | Tags: anti-beauty, beauty, body, cast, female figure, plaster, sculpture 1 CommentWith the formative assessment coming up and unfortunately having to work both Thursday and Friday evening I can’t stay in uni as long as I would like to in the next few days.
Today I cleaned my space! Properly cleaned it I mean … swept the floor.
I am not displaying my little clay models in my assessment as my project and concept has steered away from the ideas I had while I was moulding them i.e. cosmetic surgery and the ‘ideal’ figure.


As I still haven’t got the top of the thighs for either the right and left leg I have decided to ‘cut’ the body in half and I will only be casting the top half for my assessment. This also means it is technically a test piece as then I can see how it will look if I make and cast a full body (I would hopefully like to do this by the end of the year and ideally have two people.) I did create a face – my own – but I will not have this on top of the figure as I haven’t done the back of the head, but I am still planning to plaster cast it out of curiosity. (It is my own face and I didn’t notice how much it looks like me until I looked at it through my camera.)


I am still planning to create a person from “most disliked” features of the body and I think I will make sure that it is anonymous/confidential. A lot of people know what person an area of the body is taken from and I think I would prefer only myself and that person knowing next time- to give it a more mysterious feel about it.
While making this body of the ‘ideal’ figure and writing my dissertation on anti-beauty, I have begun to realise that my project is more focused on “What is ideal beauty?” Pulling together people’s best features to create this idealistic figure, the body becomes about anti-beauty and similar to an odd, bizarre creature. It expresses how it has not conformed to culture and our societies view on beauty.
